Image analysis with Clojure and OpenCV: A face detection example
I recently got not only interested in Clojure but also want to utilize it for some image analysis now. OpenCV is a very solid package for image and video analysis. Java bindings have been released for OpenCV at the beginning of 2013. Unfortunately it wasn’t as easy as I expected in the first place to use it from Clojure.
I would like to show you how to do it. Here is an outline of the necessary steps:
- compile OpenCV
- package native dependencies
- create local maven repository
- handle dependencies with leiningen
- code on! (= example time)
This guide is based on OpenCV: Introduction to Java Development and assumes you are using linux or OSX. If you are using Windows, please refer to that page for build instructions.
Compiling OpenCV
Download OpenCV sources from it’s sourceforge repository here and extract the archive. From the root of the extracted folder, create a make file first:
$ mkdir build
$ cd build
$ cmake -DBUILD_SHARED_LIBS=OFF ..
Watch the output of the last command. There should be a line ‘To be built: ‘ which includes ‘java’. If it’s not there you might be missing dependencies and the java bindings won’t be compiled.
make -j8After the build finishes, it should have produced two files that we need:
- bin/opencv-245.jar
- lib/libopencv_java245.so
These files reflect the OpenCV version, so you may have something else than ‘245’ in the filenames. The .jar file are the Java bindings, whereas the .so file (.dll for windows users) are the native libraries, which are called through the Java bindings.
Package native dependencies
We are going to put the native libraries in a .jar file, too. As these files will differ, depending where they have been built, we have to reflect this in the .jar file, so Leiningen will pick the correct library. Don’t worry it’s easy!
Create a directory where you want to build your new .jar file. Inside this directory create subfolders like this:
$ mkdir -p 'native/linux/x86_64'As you can see this has to reflect the OS and architecture. Your options are:
OS: macosx, windows, linux, solaris Architecture: x86_64, x86, arm, sparc
Copy libopencv_java245.so into the correct subfolder. So in my case it goes to ‘native/linux/x86_64’ (Linux 64bit). After that create the .jar by running this command in the folder which also contains the ‘native’ subfolder:
$ jar -cMF opencv-native.jar nativeYou should have your brand new package opencv-native.jar file now.
Create local maven repository
Leiningen pulls dependencies of projects from Maven repositories. We are going to create a local repository to hold the opencv packages.
Copy opencv.jar and opencv-native.jar to the root of your Leiningen project and execute these two commands:
$ mvn deploy:deploy-file -DgroupId=local -DartifactId=opencv \
  -Dversion=2.4.5 -Dpackaging=jar -Dfile=opencv.jar \
  -Durl=file:repo
$ mvn deploy:deploy-file -DgroupId=local \
  -DartifactId=opencv-native \
  -Dversion=2.4.5 -Dpackaging=jar -Dfile=opencv-native.jar \
  -Durl=file:repo
This creates your local Maven repository in the subfolder ‘repo’. I got this approach from a gist of Stuart Sierra to be found here.
Add Leiningen dependencies
To use OpenCV in a Leiningen project, we need to add it to the dependencies. Also, we are going to add our local repository, so Leiningen knows where to pull this packages from. Make sure you have this in your project.clj:
:repositories  {"project" "file:repo"}
:dependencies [
  [org.clojure/clojure "1.5.0"]
  [local/opencv "2.4.5"]
  [local/opencv-native "2.4.5"]]
Install Leiningen dependencies afterwards:
$ lein depsWatch the output to see how it gets the packages from your local repo.
Face detection example walkthrough
Good to see you here! You managed the hard part, now let’s have some fun and do some face detection with OpenCV and Clojure:
(ns example.opencv
  (:import
    org.opencv.core.Core
    org.opencv.core.Mat
    org.opencv.core.MatOfRect
    org.opencv.core.Point
    org.opencv.core.Rect
    org.opencv.core.Scalar
    org.opencv.highgui.Highgui
    org.opencv.objdetect.CascadeClassifier))
This simply imports all the stuff we need from OpenCV.
(def face-detections (atom []))

(defn create-classifier
  []
  (CascadeClassifier.
     (.getPath (clojure.java.io/resource
                  "lbpcascade_frontalface.xml" ))))

(defn load-image
  []
  (Highgui/imread
     (.getPath (clojure.java.io/resource "lena.png"))))
face-detections stores data of the detected faces. In fact this does not have to be an atom because we will store a mutable Java object in it. Of course that is not idiomatic in Clojure, but I want to stick closely to the original tutorial. The value of face-detections will be changed via side effects!
Furthermore we define a function to get an OpenCV classifier. This classifier defines the rules to detect faces in an image. The given .xml file is included in the OpenCV archive you downloaded. Put it into /resources directory of you Leiningen project.
load-image gets an image from the resource folder, so you have to put an image there and adjust the filename accordingly. Highgui/imread is provided by OpenCV.
(defn detect-faces!
  [classifier image]
  (.detectMultiScale classifier image @face-detections))

(defn draw-bounding-boxes!
  [image]
  (doall (map (fn [rect]
                (Core/rectangle image
                        (Point. (.x rect) (.y rect))
                        (Point. (+ (.x rect) (.width rect))
                                (+ (.y rect) (.height rect)))
                        (Scalar. 0 255 0)))
              (.toArray @face-detections)))
  (Highgui/imwrite "faceDetections.png" image))

(defn process-and-save-image!
  []
  (let [image (load-image)]
    (detect-faces! (create-classifier) image)
    (draw-bounding-boxes! image)))
Most of the magic happens here! The first function detects faces in the given image using the given classifier. This actually changes face-detections as a side effect! Not idiomatic in Clojure, but that’s how OpenCV works. Let’s keep it simple for now on use it like this.
draw-bounding-boxes! modifies the given image and draws rectangles around faces which have been detected. It maps through all detected faces, creates a green rectangle for every face and draws that onto the image. Drawing the rectangles is a side-effect that we need, so we have to call ‘doall’ on our lazy sequence returned by ‘map’ to make it actually happen. In a final step we write the image to the file system.
The last function here ‘process-and-save-image!’ just brings together the functions we discussed so far and calls them in the right order. As the mutable value of face-detection gets modified in a side-effect, we don’t have to pass this around or update the atom reference.
(defn main
  []
  (clojure.lang.RT/loadLibrary Core/NATIVE_LIBRARY_NAME)
  (reset! face-detections (MatOfRect.))
  (process-and-save-image!))
And finally here is our entry point. There is a very important thing here: You have to load the native libraries before you can work with the Java bindings. The name of the native library is retrieved from the Core class.
After that we reset face-detections to hold a new instance of ‘MatOfRect’. We could only do that after loading the native libraries, that’s why we put an empty vector in face-detections previously when defining the atom.
Finally we call our function to load and process the image. If everything goes well, after running ‘main’ you should have a new image file, where the detected faces are indicated with green rectangles.
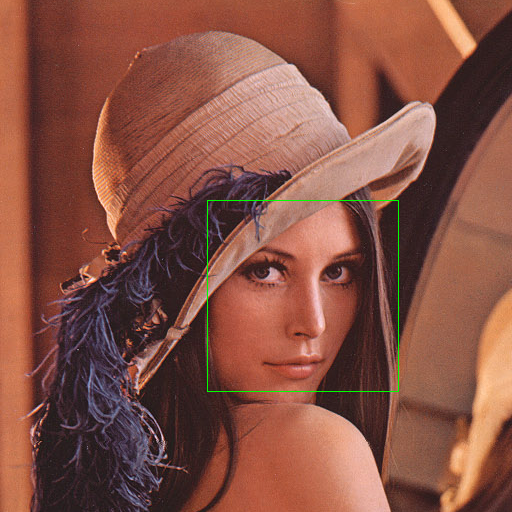
That’s nice, isn’t it? Make sure to run it on an image with multiple faces! The whole code can be found in a gist over here
Please let me know what you think and if this did work for you. Do not hesitate to ask, if you run into issues somewhere or if I wasn’t clear at some point.